
Endpoint quick start
Request accessThis quick start takes you from the onboarding email you received to a lane-level map rendered on your own computer. It covers the following:
- Prerequisites — what you need before you begin
- Step-by-step guide — the eleven steps in order
- Troubleshooting — what to do when a step fails
Allow about an hour for a first run, most of which is spent downloading container images.
Prerequisites
All items in both tables are mandatory.
Accounts and access details
You receive, create or generate these as you follow the steps listed below. See Access and accounts.
| Prerequisite | Notes |
|---|---|
| Step 1: Endpoint URL | Your Smart Layer Tile Service (SLS) endpoint, from your onboarding email. |
| Step 3: My.TomTom API key | To verify it, run the curl call from step 4. It must return an OpenAPI service definition. |
| Step 5: NDS.Live account | Separate from My.TomTom. |
| Step 6: Artifactory identity token | Generated in NDS Artifactory for your NDS.Live account. Shown only once — treat it like a password. |
Software
Make sure you have these, or install them in step 7.
| Prerequisite | Notes | How to check |
|---|---|---|
| Docker or Podman | Must be running, not just installed. | docker run hello-world orpodman run hello-world prints its hello message. |
| Python 3.10 to 3.13 | The NDS.Live packages support Python 3.10 to 3.13. ndslive-setup fails on Python 3.9.The python3 that comes with Xcode Command Line Tools on macOS is 3.9.6. Step 7 installs Python 3.12. | python3.12 --version reports Python 3.12. |
| pipx | Installs ndslive-setup in step 8. On Homebrew Python, pip can’t install it. | pipx --version prints a version number. |
The eleven steps
- Onboarding email.
- My.TomTom account.
- My.TomTom API key.
- SLS endpoint check.
- NDS.Live account.
- Artifactory identity token.
- Docker, Python and pipx.
- Set up ndslive.
- MapViewer environment.
- SLS endpoint and API key in MapViewer.
- Lane-level content.
Systems and software each step uses
Step 1: Onboarding email
TomTom sends an onboarding email once your access is provisioned. It comes from Sales Contract Admin, with the subject [INFO] NDS Live - Getting started. It contains the following:
- The evaluation endpoint URL for your package
- The production endpoint URLs, according to your entitlements
The My.TomTom invitation doesn’t come in this email. TomTom sends it in a separate email; you accept it in step 2.
The email lists each endpoint with its licensed product name, such as Orbis ADAS Map, and its package, such as ADAS Road Model.
This quick start uses an evaluation endpoint. You’ll need its URL in step 4 and again in step 10.
Read about the difference between evaluation and production endpoints.
Step 2: My.TomTom account
Accept your My.TomTom invitation. TomTom onboards you to My.TomTom and sends the invitation in a separate email.
Step 3: My.TomTom API key
Create your My.TomTom API key in the project TomTom set up for you. It must have the NdsLive API assigned, and the entitlements TomTom added when it provisioned your access.
Step 4: SLS endpoint check
Confirm your API key and endpoint work together. Take the endpoint URL from your onboarding email (step 1), and append your API key as a query parameter. For example, for the Intelligent Speed Assistance (ISA) evaluation endpoint:
curl "https://api.tomtom.com/ndslive/smart-layer-service/eval/6/ISA-2026-06/XXX-ae556b96e330/openapi.json?apiKey=YOUR_API_KEY"Expected output: the OpenAPI definition of the service, as JSON on a single line. It begins like this:
{"openapi":"3.0.1","info":{"description":"TomTom UMD Smart Layer Service Public API.\n\nThis is the public API for the TomTom UMD Smart Layer Service. ...Evaluation endpoints are available for the following packages:
| Package | Contains |
|---|---|
| ISA | Roads, road geometry, road rules (including speed limits), road characteristics, region rules |
| ADAS Road Model | Everything in ISA, plus ADAS road attributes and lanes |
| Navigation | Everything in ADAS Road Model, plus routing, guidance instructions, road names and POIs |
| Lane Model | Lanes only, with no roads: lane geometry and topology, road surface, landmarks, drive paths, ADAS lane attributes, lane routing |
An endpoint URL changes when TomTom retires the endpoint. From then on, the old URL returns 410.
Step 5: NDS.Live account
Create your NDS.Live account with the same email address you used for My.TomTom, then sign in to the NDS.Live developer portal.
Step 6: Artifactory identity token
Generate an Artifactory identity token and store it securely. The setup wizard needs it in step 8, and the token is shown only once.
Step 7: Docker, Python and pipx
Install a container runtime and start it. ndslive-setup and MapViewer work with either Docker Desktop or Podman. The runtime must be running, not just installed.
If you don’t have a container runtime yet, install one of them:
- Docker Desktop: download, install and open.
- Podman on macOS: run
brew install podman.
# Open Docker Desktop first, then check that it runs containersdocker run hello-world# Create the Podman machine once, then start itpodman machine initpodman machine startpodman run hello-worldExpected output: Docker prints a message that begins with Hello from Docker!. Podman runs its own test image and prints !... Hello Podman World ...!, followed by links to the Podman project.
The runtime has to be running whenever you use ndslive-setup or MapViewer. After a restart, open Docker Desktop again, or run podman machine start. Otherwise, MapViewer reports that the container runtime is not running.
Then install pipx, which installs the setup wizard in step 8:
brew install pipxpipx ensurepathExpected output: pipx ensurepath adds the folder where pipx installs tools to your PATH, or, if the folder is already there, says so and ends with pipx is ready to go!. If it added the folder, open a new terminal window before you continue.
The NDS.Live packages support Python 3.10 to 3.13. brew install pipx also installs the newest Python, which can be outside that range, so install Python 3.12 for the NDS.Live tools:
brew install python@3.12python3.12 --versionExpected output: Python 3.12, followed by the patch version, for example Python 3.12.15.
Step 8: Set up ndslive
Install the setup wizard with Python 3.12, then start it:
pipx install --python python3.12 ndslive-setupndslive-setupThe wizard opens in your terminal. Its stages are listed on the left, and you move through them with Continue. Press Esc to quit.
-
Welcome lists what the wizard sets up: access to the NDS container registry and the NDS Python package index, a virtual environment, and the NDS.Live Python packages.
-
Prerequisites checks Python, pip, venv, your container runtime and the container registry. If a check fails, fix its cause and select Re-check.
-
Artifactory asks for your username and the identity token from step 6. Select Verify & Setup. If the token field doesn’t accept paste, set up access outside the wizard. The wizard logs in to the container registry, configures the Python package index, and detects your edition. If your access is already configured, the wizard skips this stage.
-
Environment: keep the default, Create a fresh virtual environment, at
~/.nds/venv.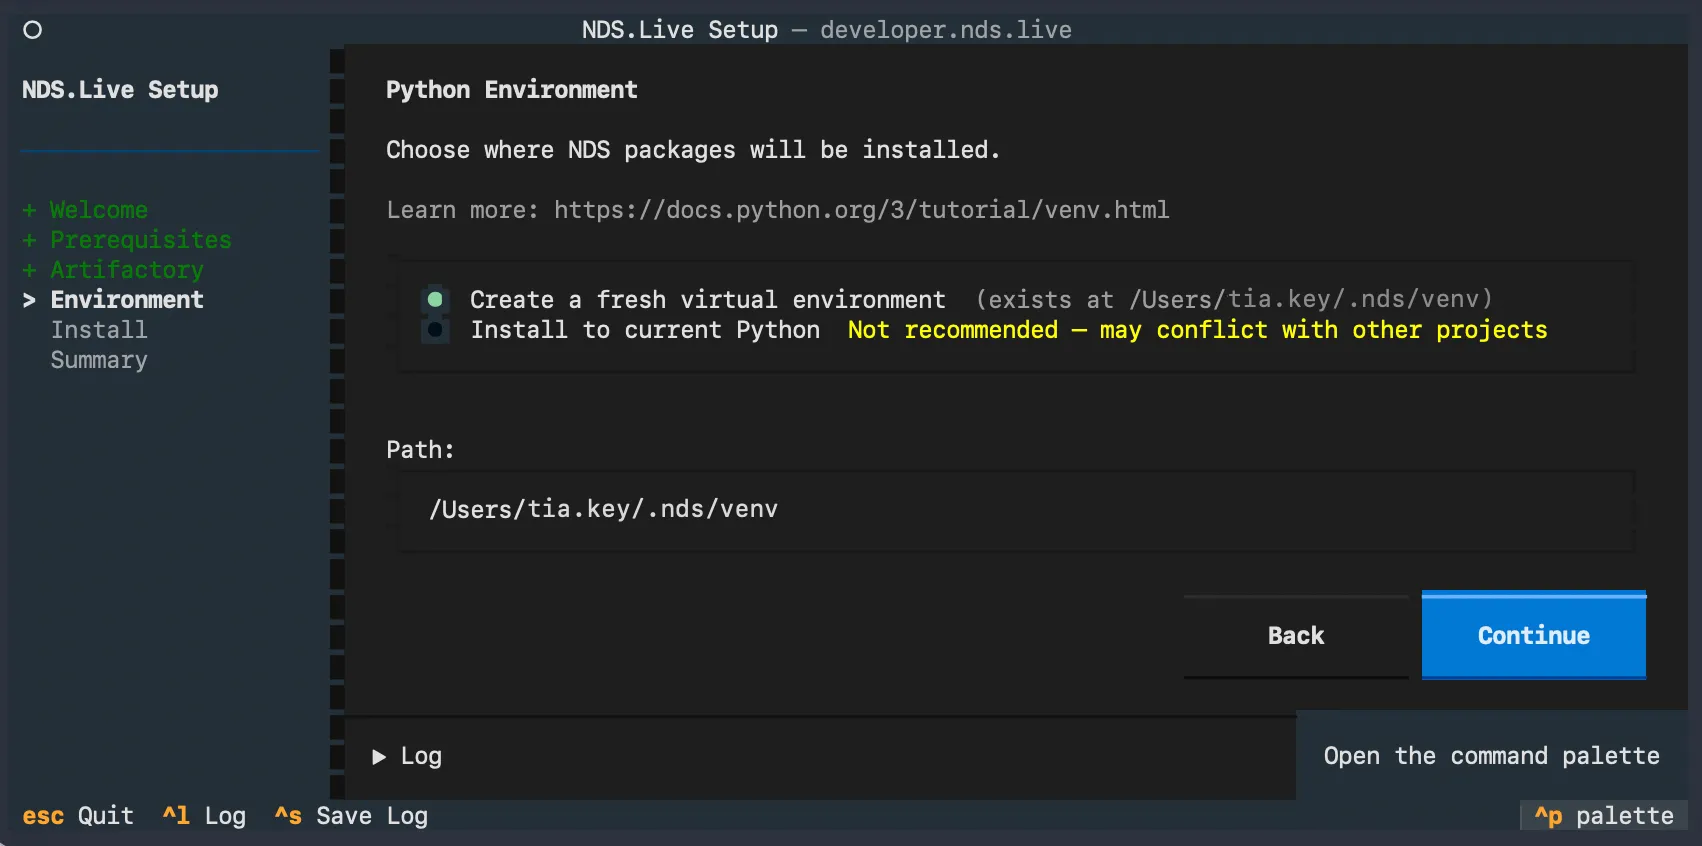
-
Install: keep both
ndsliveandnds-mapviewerselected, and select Install Selected. Installing onlyndsliveleaves you without the viewer, and the failure doesn’t show until step 9, whenmapviewerisn’t found.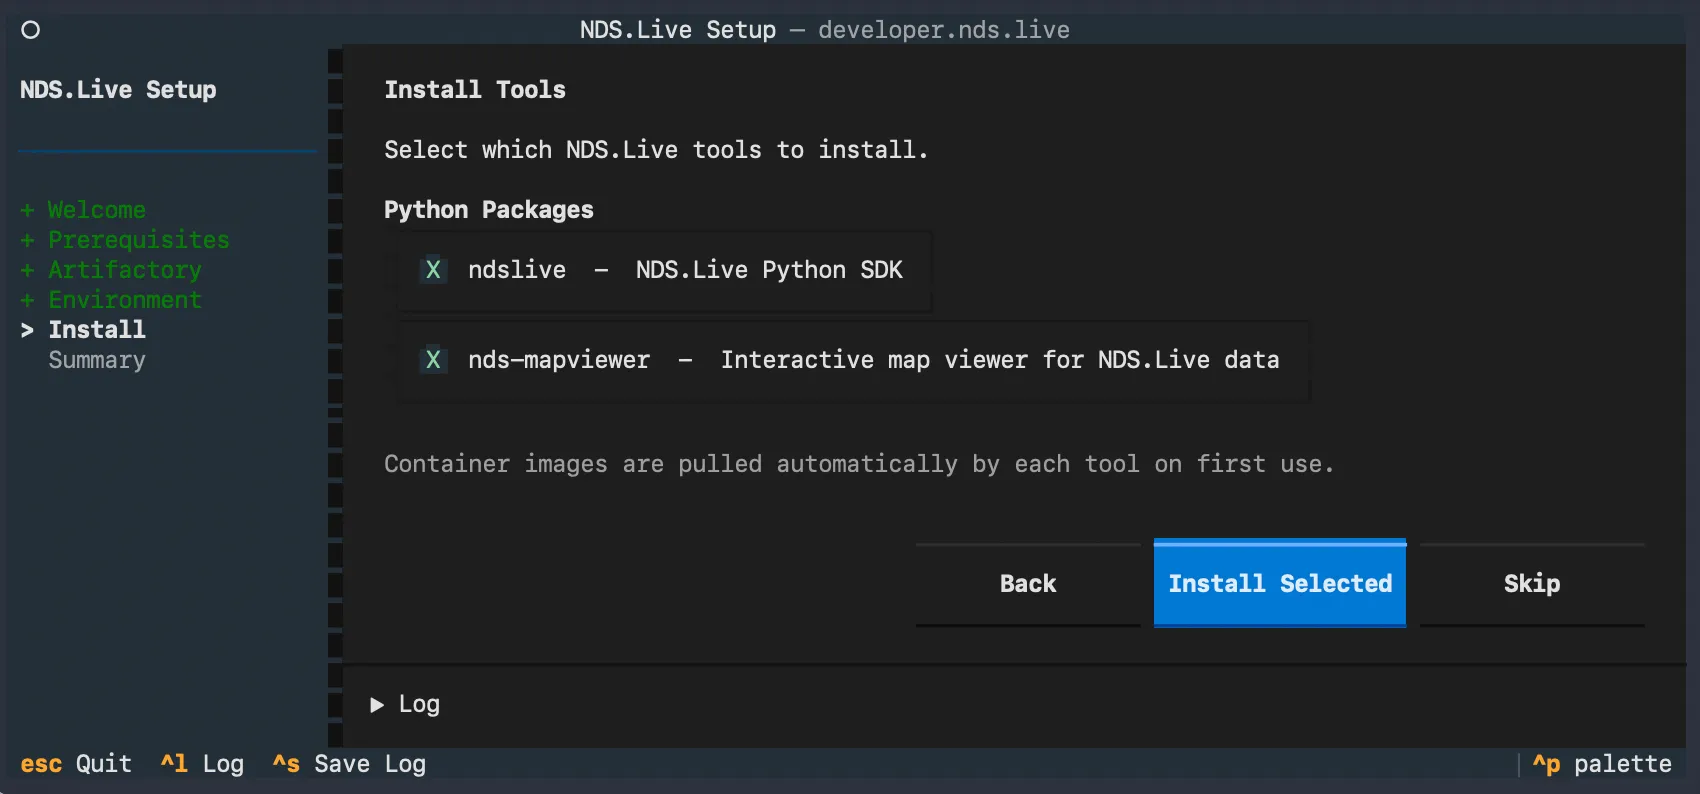
-
Summary lists your edition, the container registry, the Python package index, the virtual environment and the installed packages. It ends with the command that activates the environment, which you run in the next step.
The wizard detects your edition from the registries your NDS.Live account can access:
- Community: NDS.Live only, for users whose company isn’t an NDS Association member
- Member: NDS.Live and NDS.Classic, for employees of NDS Association member companies
The wizard saves your choices in ~/.nds/setup.json, and MapViewer reads them from there. The wizard also saves your identity token in plain text in pip’s configuration file, pip.conf, so protect that file like the token itself. pip describes other ways to store credentials.
Container images aren’t downloaded yet: each tool pulls its image the first time you use it.
To check the result, run ndslive-setup status:
ndslive-setup statusExpected output:
NDS.Live Setup Status┌────────────────────┬────────────────────────────┐│ Edition │ member ││ Container Registry │ + logged in (Podman 6.1.3) ││ Python Index │ + configured │└────────────────────┴────────────────────────────┘Your edition and container runtime can differ. Container Registry and Python Index must both show +. If they don’t, run ndslive-setup doctor to diagnose the setup.
Step 9: The MapViewer environment
The wizard installs into its own virtual environment, which isn’t active in your shell yet. To activate it, run:
source ~/.nds/venv/bin/activateThen confirm the viewer is on your path:
which mapviewerExpected output: a path inside ~/.nds/venv/bin/.
If it prints nothing or mapviewer not found, the environment isn’t activated.
A path alone doesn’t prove the viewer works, so check that it starts:
mapviewer --helpExpected output: the MapViewer help, which begins like this:
usage: mapviewer [-h] [--version] [--demo] [-e {community,member}] [-i IMAGE_VERSION] [--no-browser] [-p PORT] [--bind BIND] [--env KEY=VALUE] [--debug] [--network NAME] [--pull | --no-pull] [sources ...]
NDS MapViewer - view NDS.Live map dataIf you see something else:
command not found: mapviewer: the environment isn’t activated.dyld: Library not loadedand thenzsh: abort: a Homebrew update removed the Python release the environment uses.
Before you connect your endpoint, you can check that the viewer runs. With Docker or Podman running, start MapViewer with the NDS Association’s sample data:
mapviewer --demoThe first run downloads the MapViewer image, which can take several minutes. MapViewer then opens in your browser, at http://localhost:8089 unless that port is already taken. If the download fails with a permissions error, check your identity token. If it fails with another error, see MapViewer can’t pull its image.
Step 10: SLS endpoint and API key in MapViewer
MapViewer reads its data sources from a YAML configuration file. You need a remote SmartLayerTileService source pointing at your endpoint, with your API key supplied through http-settings.
sources: - type: SmartLayerTileService # Use your actual SLS endpoint uri: https://api.tomtom.com/ndslive/smart-layer-service/eval/6/HD-highways-only/XXX-0c4bdceae490/openapi.json mapId: Orbis v4 Endpointhttp-settings: # Send the API key only to NDS.Live requests - scope: https://api.tomtom.com/ndslive/* query: # Use your actual API key apiKey: YOUR_API_KEYThis snippet uses the following values:
uri— your endpoint URL (step 4)apiKey— your actual API key (step 3), on the same line asapiKey:. If the key ends up on a line of its own, MapViewer shows the demo and ignores your file.mapId— the name MapViewer shows for this source in its layers panel. You can choose any name.scope— the URL pattern a request must match to carry your API key. In this snippet, only URLs starting withhttps://api.tomtom.com/ndslive/match, so your key goes only to NDS.Live and never to another host or another TomTom API.
Your onboarding email contains a similar configuration. If you copy it from there, check two things:
- The API key: replace
[YOUR_API_KEY], including the square brackets. In YAML, square brackets make a list, so your key wouldn’t be sent as a plain string. - The scope: set it to
https://api.tomtom.com/ndslive/*, as in the snippet above, so that only NDS.Live requests carry your key. Keep the/before the*: without it, the pattern may also match other hosts whose names begin withapi.tomtom.com.
Save the configuration as ~/.nds/config.yaml. MapViewer loads this file automatically when you start it without arguments:
mapviewerMapViewer shows a status screen in your terminal and opens the viewer in your browser. Before that, it may ask whether to pull MapViewer image updates: select Pull this time to get the newest version, or Skip this time to start with the image you have. You can change this choice later in MapViewer’s image settings: press i on the status screen.
Expected output: the status screen shows running and the viewer’s address, http://localhost:8089, and the configuration file it read. Its log shows Launching NDS.Live datasource for URI with your endpoint, followed by NDS MapViewer is ready!.
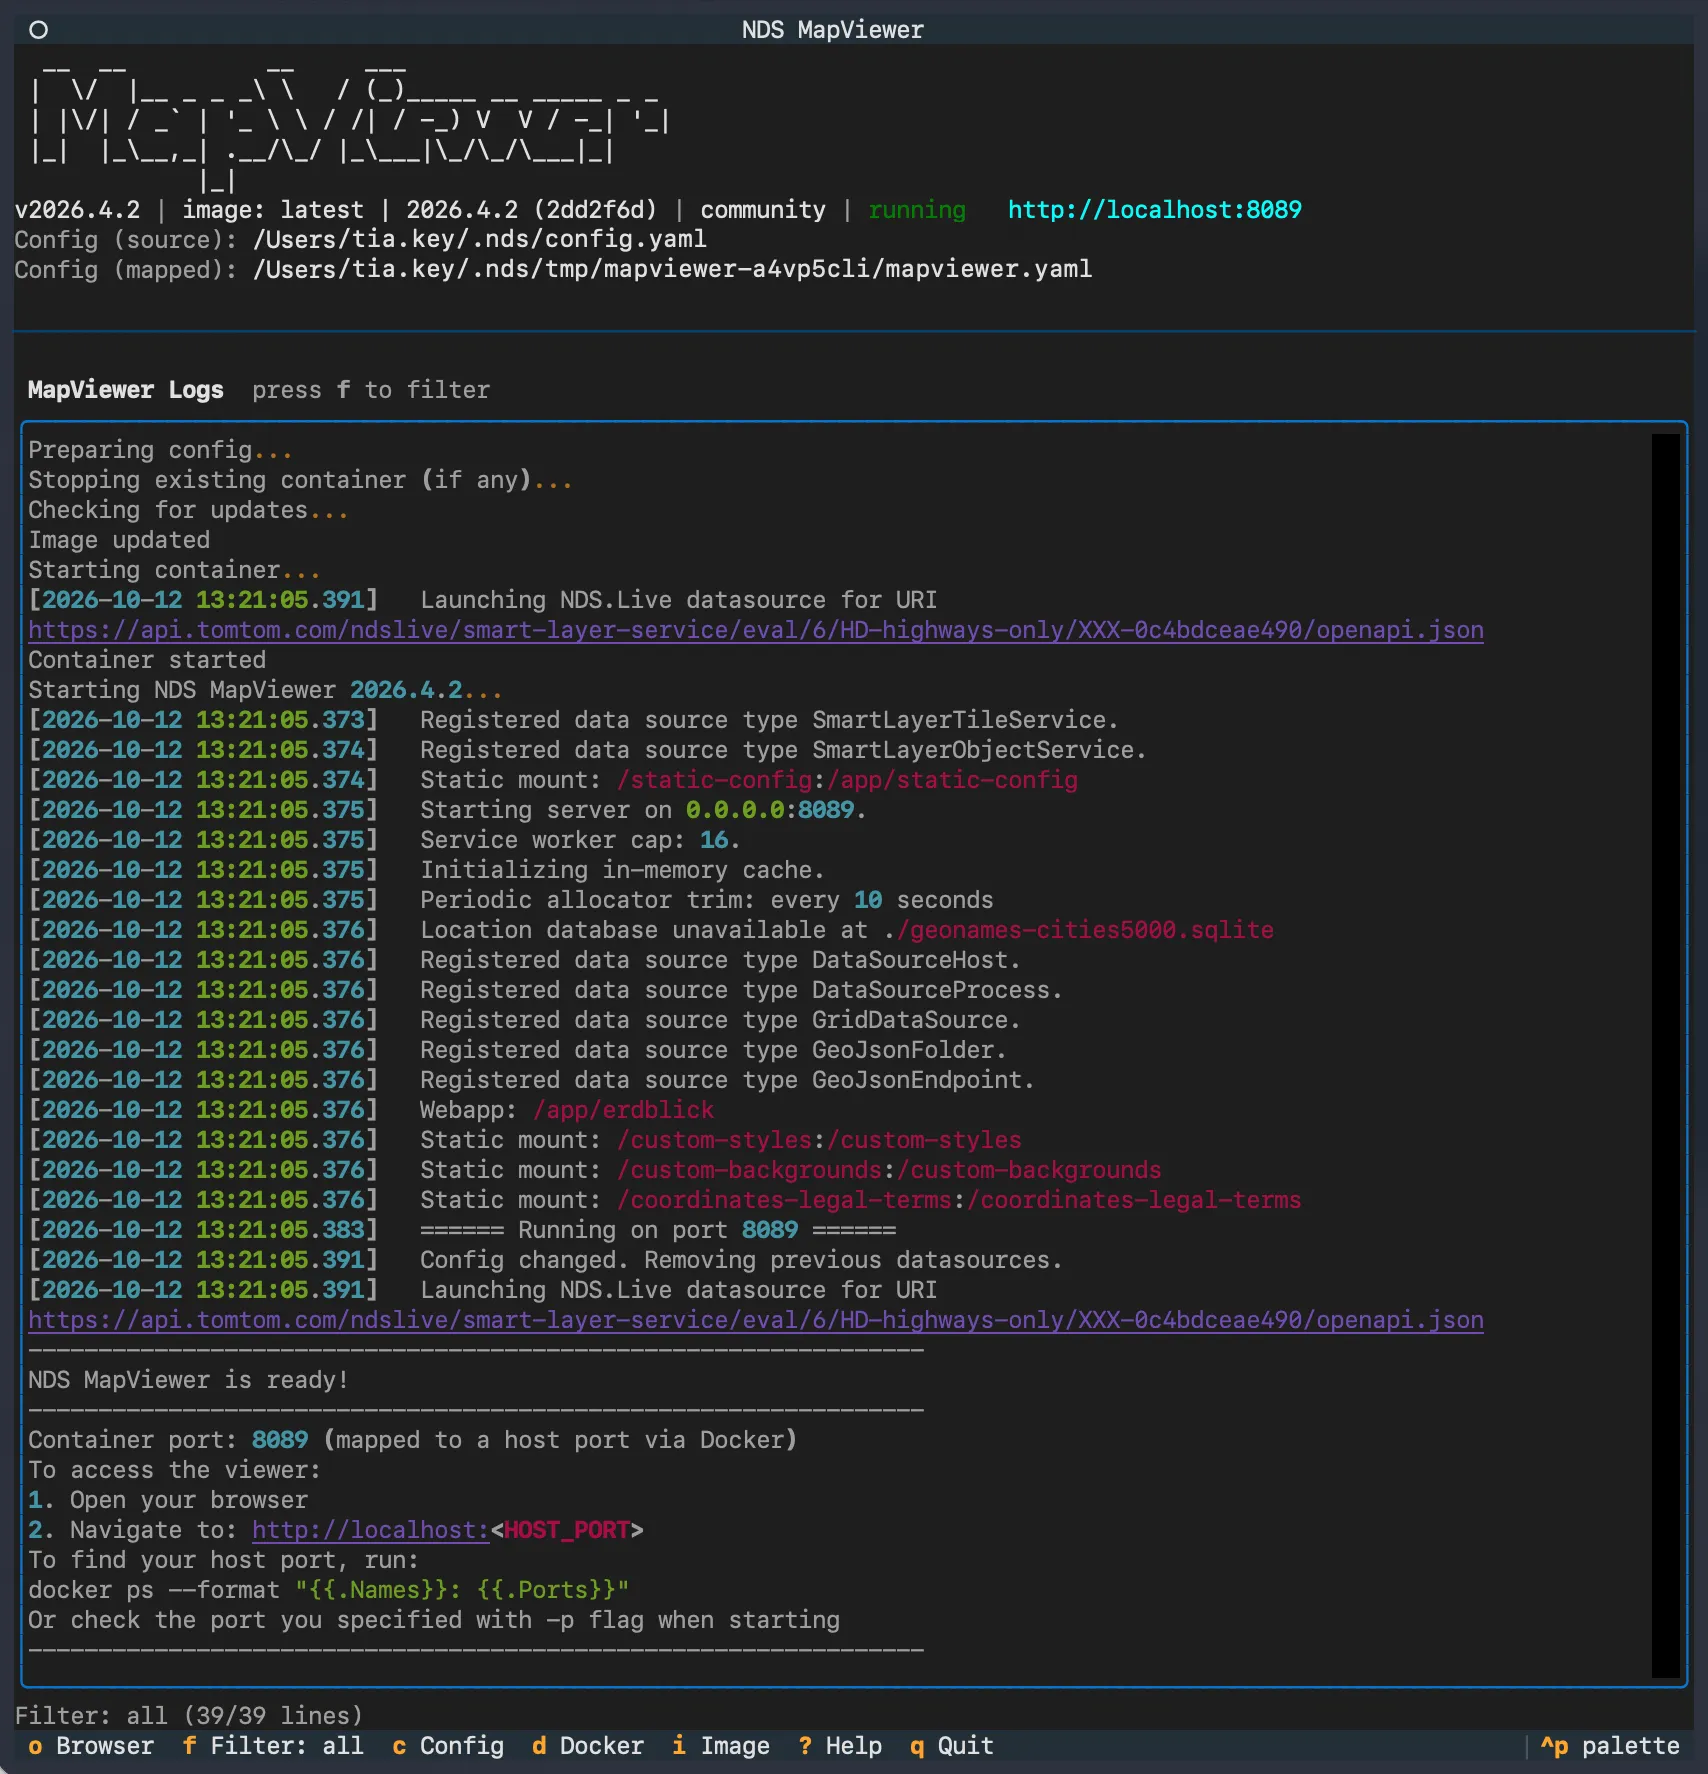
Below NDS MapViewer is ready!, the log suggests finding the port with docker ps. You don’t need to: use the address at the top of the status screen. To open the viewer again, press o. To stop MapViewer, press q, then select Yes, quit. This also stops MapViewer’s container.
If MapViewer stops with Failed to pull image, it can’t pull its image from the member registry. In that case, start it with the community edition: mapviewer -e community.
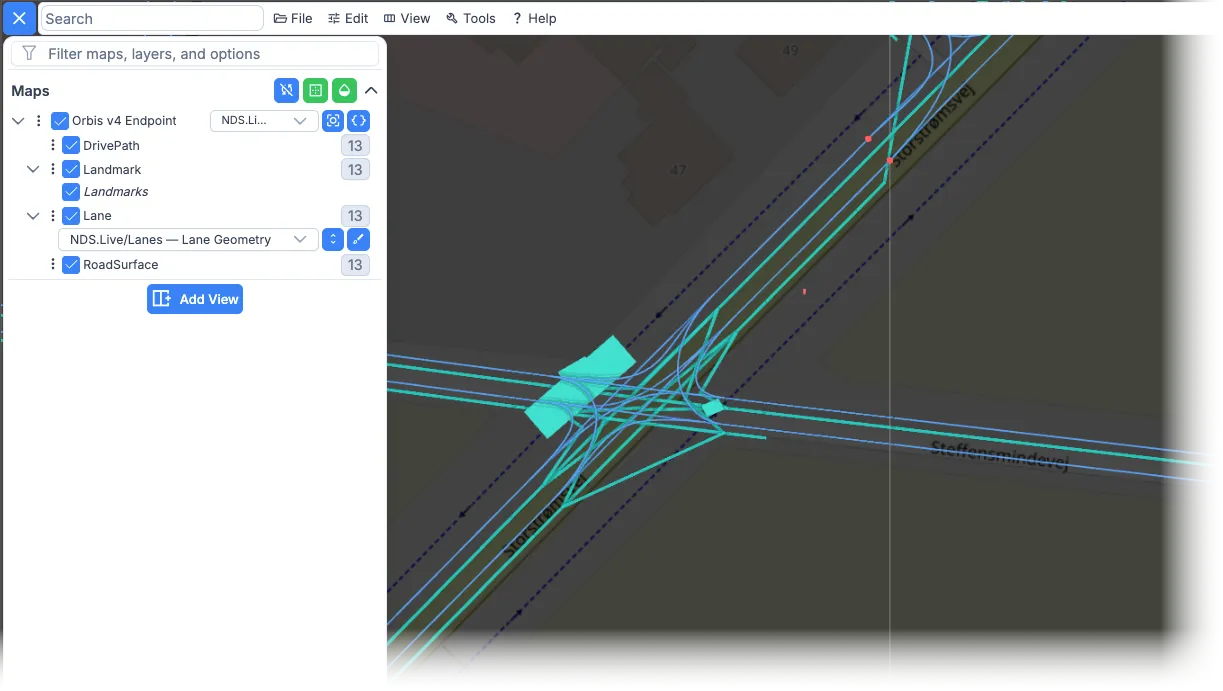
In the browser, open the layers panel with the icon at the top left. Your source appears under Maps, with the name you gave it as mapId, and its layers below it.
You can also keep the configuration somewhere else:
- Several configurations: save each one as
~/.nds/configs/NAME.yaml, and start it withmapviewer NAME. - Any other folder: pass the file’s path, for example
mapviewer ./my-endpoint.yaml.
Older guides use ~/.nds/mapviewer.yaml. MapViewer still reads it, but the name is deprecated: rename the file to ~/.nds/config.yaml.
The file contains your API key, so keep it on your computer and don’t share or commit it.
Step 11: Lane-level content
In the viewer, zoom in on a road your package covers. All layers are on by default; turn them off and on with their checkboxes.
Lanes appear only when you zoom in close, to about street level.
To go to a place directly, change lon= and lat= in the viewer’s address in your browser, then press Enter. For example, lon=11.778&lat=54.885 opens the junction in the screenshot below. The Search field doesn’t find places: it searches the features of the loaded layers.
Expected output: the lanes of the road, drawn as separate lines, with their connections at junctions.
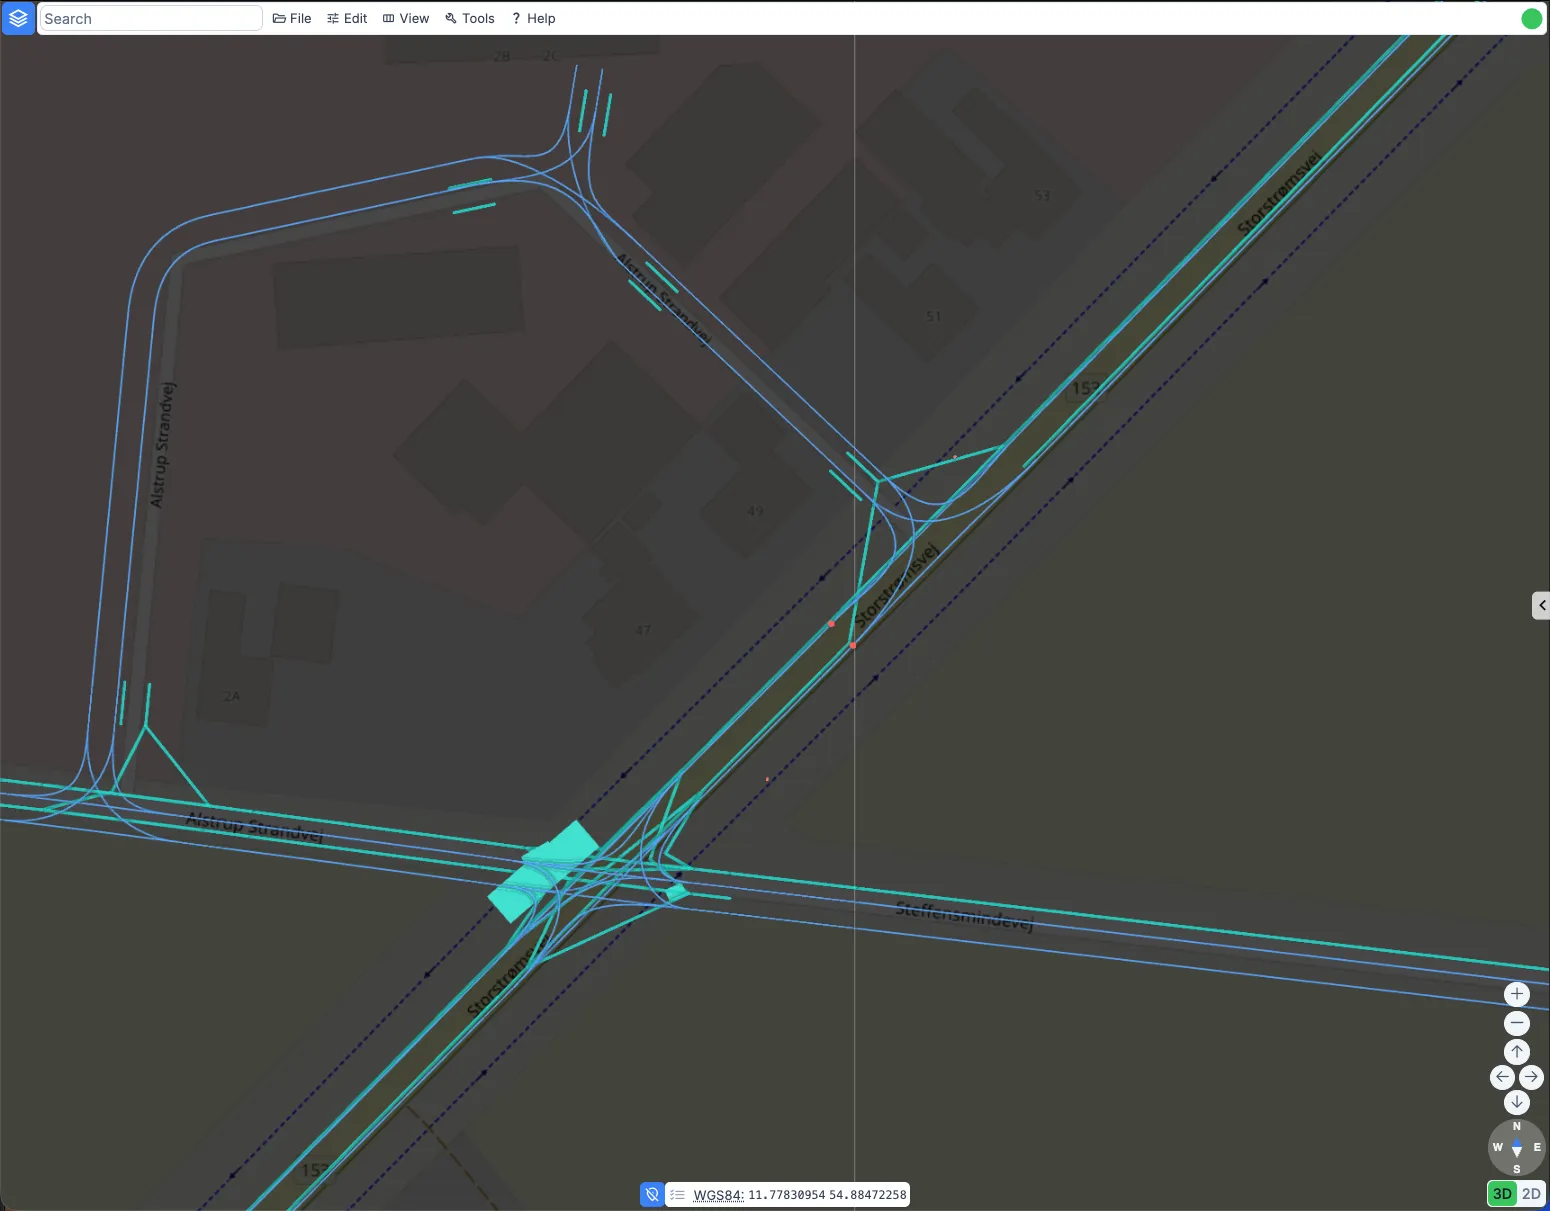
This guide uses Lane Model as its example: the package focused on lane-level content. It has no road layer, so the viewer shows lanes but no roads. ADAS Road Model and Navigation show both. ISA has no lane layers, so with an ISA key this step shows no lanes.
Seeing roads or lanes rendered in the viewer means the whole chain works: your key, your entitlements, the endpoint, and the tooling.
From evaluation to production
In this quick start, your map data component calls one evaluation endpoint directly, with your API key. A map data component in production works differently:
- It finds its services in the NDS.Live Registry. A map data component in production doesn’t call a Smart Layer Tile Service at a fixed URL. It gets the service URLs from the NDS.Live Registry, which also lets it fail over to another endpoint.
- In a vehicle, it doesn’t use a TomTom API key. Automotive customers usually go through TomTom’s access control system (ACS). Your authorization service issues a short-lived JWT token to each vehicle, and ACS selects the API key for the right maps.
Troubleshooting
These are the problems that come up most often while you install the tools and start MapViewer.
The setup wizard fails on the Python version
Symptom: python3 --version reports 3.9.6, and the installation fails.
Cause: The python3 that comes with Xcode Command Line Tools on macOS is 3.9.6. ndslive-setup supports Python 3.10 to 3.13.
Fix: Install Python 3.12, and install the wizard with it:
brew install python@3.12pipx install --force --python python3.12 ndslive-setupThen run ndslive-setup again.
pipx installs a Python release the NDS.Live packages don’t support
Symptom: After brew install pipx, python3 --version reports the newest Python release, such as 3.14, and ndslive-setup or its packages misbehave.
Cause: Homebrew installs the latest Python as a dependency of pipx, and pipx uses it by default. The NDS.Live packages support Python 3.10 to 3.13.
Fix: Install a Python release the packages support, and tell pipx to use it:
brew install python@3.12pipx install --python python3.12 ndslive-setupIf you already installed ndslive-setup with the newer Python, add --force to the pipx install command to reinstall it.
Installing with pip fails with an externally managed environment error
Symptom: pip install ndslive-setup exits with error: externally-managed-environment.
Cause: Homebrew-managed Python installations refuse system-wide pip install by design.
Fix: Use pipx install ndslive-setup, or create and activate your own virtual environment first.
The identity token field ignores paste
Symptom: In ndslive-setup, pressing Cmd+V in the Identity Token field shows nothing, and the Verify & Setup button stays disabled.
Cause: The field is a password input in a terminal interface, and it doesn’t accept paste in every terminal.
Fix: Do the Artifactory step outside the wizard.
-
With the identity token from step 6 on your clipboard, sign in to the container registry for your edition. Your username is the email address of your NDS.Live account.
Docker Desktoppbpaste | docker login -u YOUR_NDS_LIVE_EMAIL --password-stdin artifactory.nds-association.org/ndslive-dockerregPodmanpbpaste | podman login -u YOUR_NDS_LIVE_EMAIL --password-stdin artifactory.nds-association.org/ndslive-dockerregThese commands use the community registry. For the member edition, replace
ndslive-dockerregwithtooling-dockerreg. -
Add the NDS.Live Python package index to
~/.config/pip/pip.conf. The index is the same for both editions:~/.config/pip/pip.conf[global]index-url = https://YOUR_NDS_LIVE_EMAIL:YOUR_IDENTITY_TOKEN@artifactory.nds-association.org/artifactory/api/pypi/tooling-pypi/simpleextra-index-url = https://pypi.org/simpleIn the URL, write the
@in your email address as%40. The file stores your token in plain text, so keep it private.
When both are in place, ndslive-setup skips its Artifactory step.
MapViewer is not found although it installed
Symptom: which mapviewer returns nothing, or the shell reports command not found, even though the wizard completed successfully.
Cause: The wizard installs into ~/.nds/venv, which is not active in your shell.
Fix:
source ~/.nds/venv/bin/activatewhich mapviewerYou need to run the source command again in each new terminal session.
MapViewer stops after a Homebrew update
Symptom: mapviewer or python in the MapViewer environment stops with dyld: Library not loaded: /opt/homebrew/Cellar/python@3.12/3.12.14/... and zsh: abort. which mapviewer still prints a path in ~/.nds/venv/bin/, because the mapviewer command is still there. It’s the Python release behind it that is missing.
Cause: The wizard built ~/.nds/venv with an exact Homebrew Python release. When Homebrew updates Python, it deletes the old release, and the environment can’t find its interpreter any more.
Fix: Point the environment at the Python release Homebrew has now. Your installed packages stay as they are.
-
Leave the environment, and update its interpreter. Use the same minor version the environment was built with, such as 3.12:
Update the environment's Pythondeactivate/opt/homebrew/bin/python3.12 -m venv --upgrade ~/.nds/venvIf this prints
Unable to symlink, it copied the new interpreter topython3.12. Continue with the next step. -
Point
pythonandpython3at the updated interpreter, then check:Point python and python3 to the update, and checkln -sf python3.12 ~/.nds/venv/bin/pythonln -sf python3.12 ~/.nds/venv/bin/python3source ~/.nds/venv/bin/activatepython --versionmapviewer --help
To stop Homebrew from updating that Python release, run brew pin python@3.12. If the fix doesn’t work, delete ~/.nds/venv and run ndslive-setup again.
MapViewer reports that the container runtime is not running
Symptom: mapviewer stops with Container runtime is not running.
Cause: Docker Desktop isn’t open, or the Podman machine isn’t started. This happens after every restart of your computer.
Fix: Start your container runtime, then run mapviewer again:
- Docker Desktop: open the app, and wait until it reports that it’s running.
- Podman on macOS: run
podman machine start.
To check what’s wrong with your setup, run ndslive-setup doctor.
The image pull fails with a permissions error
Symptom: The MapViewer image pull fails with a message that permission for a manifest is denied, or MapViewer reports Not logged into registry.
Cause: Your Artifactory identity token is missing, expired, or lacks permissions in NDS Artifactory.
Fix: Confirm the token before you start debugging your endpoint or API key — the two failures look similar from the outside but have nothing to do with each other. Regenerate the token in NDS Artifactory and re-run ndslive-setup.
If the message says that the repository name isn’t known, the cause is different: MapViewer can’t pull its image.
MapViewer can’t pull its image
Symptom: mapviewer stops with Failed to pull image: artifactory.nds-association.org/tooling-dockerreg/nds-mapviewer:latest-arm64 (or latest-amd64 on a Mac with an Intel processor). Opening that address in a browser returns 404, but that is expected for any image, so it doesn’t tell you anything.
Cause: The wizard detected the member edition for your account, but your account can’t read the MapViewer image in the member registry, tooling-dockerreg.
Fix: Use the community edition. Its registry, ndslive-dockerreg, has the same MapViewer releases:
mapviewer --demo -e communityTo make the community edition your default, run ndslive-setup again and choose Community, or set "edition": "community" in ~/.nds/setup.json.
MapViewer ignores your configuration file
Symptom: you saved ~/.nds/config.yaml, but mapviewer opens its home screen, with New Config, Demo and Refresh, or its status screen shows Config (source): built-in (demo). In the browser, the layers panel lists the NDS Association’s sample islands, not your endpoint.
Cause: MapViewer couldn’t read config.yaml, for example because of a YAML error. It doesn’t report the error: it opens its home screen.
Fix: in the activated environment, let MapViewer load the file and show the error:
python -c "from ndslive.mapviewer.config import load_config, DEFAULT_CONFIG; print(sorted(load_config(DEFAULT_CONFIG)))"If the file is valid, the command prints ['http-settings', 'sources']. Otherwise, it ends with Invalid YAML and the line and column of the error. The error can quote that line, so check it for your API key before you share the output. A common cause is the API key on a line of its own: put it on the same line as apiKey:, then start MapViewer again.
Next steps
- Read the NDS Association’s guidance for how the tile services are meant to be consumed, and use its Python SDK as a sample client. It already handles the tile requests, so you don’t have to write a tile downloader from scratch.
- When you move from evaluating to building, read the architecture and integration guidance — tile download strategy, the NDS.Live Registry for service discovery and failover, node ID changes, and the module update strategy all affect how you design your integration.
Related resources
- Access and accounts
- Access and accounts: Your endpoints
- Smart Layer Tile Service
- Ways to get map data
- Request and response patterns: Why 410 matters
- Architecture overview: NDS.Live Registry
- Architecture overview: Integration essentials
- Architecture overview: Module updates
- NDS.Live developer portal
- pip documentation: Authentication
- Docker Desktop
- NDS.Live